Top 10 yoga poses for beginners

New to yoga? Start here with beginner yoga poses and best yoga poses sequence that are essential for you to build strength and confidence to take your yoga practice deeper.
As a beginner to yoga , you might feel overwhelmed by the number of poses and their odd-sounding names. Relax- Here are steps that can help you build up to the 'slow and gradual' processes of yoga then roll out on yoga mat for the best yoga workout for beginners.
The more you practice yoga, the more you're building awareness in your body,The biggest thing to do as a beginner is to start and then stay consistent with your practice,remember that practice makes progress.BEGIINER TIPS
As you progress, you can take on more challenging poses but it's a good idea to keep things simple when you're just starting .The Beginners yoga poses outlined here are valuable enough to keep you occupied for a long time.
1. Mountain Pose (Tadasana)

This pose teaches one to stand with majestic steadiness like a mountain. The word 'Tada' means a mountain, that's where the name comes from .Mountain Pose is the base for all standing poses; It involves the major groups of muscles and improves focus and concentration. Mountain pose may seem like "simply standing," but there is a lot going on.
How to do it
- Stand with your toes together and heels slightly apart hang your arms besides the torso.
- Spread your toes and place your weight evenly on your feet. Firm your thigh muscles while rotating them inwards Relax your shoulders and roll them back and down.
- As you inhale, elongate your torso and when you exhale release your shoulder blades away from your head. You may also put your hands in prayer position in front of your chest, or rest them by your sides.
- Take long, slow, deep breaths in
Beginner's Tip
You can check your alignment by standing against the wall initially. You can even raise your hands and stretch them. Breathe easy.
2. Tree Pose (Vrksasana)

Tree is an awesome standing balance for beginners to work on to gain focus and clarity, and learn to breathe while standing and keeping the body balanced on one foot. . It replicates the steady stance of a tree.
How to do it
- Start with your feet together and place your right foot on your inner left upper thigh. Press your hands in prayer and find a spot in front of you that you can hold in a steady gaze.
- Hold and breathe for 8-10 breaths then change sides. Make sure you don't lean in to the standing leg and keep your core engaged and shoulders relaxed.
Beginner's Tip
You can stand with your back braced against a wall if you feel unsteady in this pose.
3. Triangle (Trikonasana)

Triangle is a wonderful standing posture to stretch the sides of the waist, open up the lungs, strengthen the legs and tone the entire body.Triangle Pose is the essential standing pose in many styles of yoga.
How to do it
- Stand with your feet wide apart. Stretch your right foot out (90 degrees) while keeping the leg closer to the torso. Keep your feet pressed against the ground and balance your weight equally on both feet.
- Inhale and as you exhale Rest your right hand on your shin, ankle, or the floor outside your right foot, Stretch your left arm toward the ceiling.
- Turn your gaze up to the top hand and stay in this pose for 5-8 breaths. Inhale to come up and repeat on the opposite side.
Beginner's Tip
Place your back heel or the back of your torso against a wall if you feel unsteady in the pose.
4. Warrior I (Virabhadrasana I)
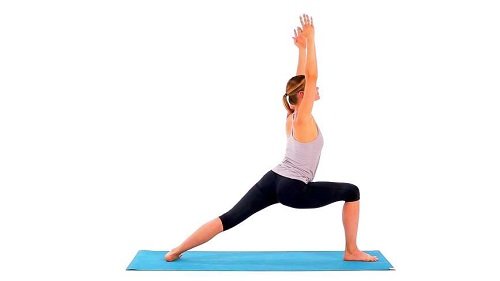
Warrior pose is quintessential for building strength and stamina in a yoga practice. It give us confidence and stretch the hips and thighs while building strength in the entire lower body and core.
How to do it
- Stand in Tadasana (Mountain Pose). With an exhale, step or lightly jump your feet apart. Raise your arms perpendicular to the floor (and parallel to each other)
- Turn your left foot in 45 to 60 degrees to the right and your right foot out 90 degrees to the right. Align the right heel with the left heel. Exhale and rotate your torso to the right.
- With your left heel firmly on the floor, exhale and bend your right knee over the right ankle so the shin is perpendicular to the floor.
- To come up, inhale, press the back heel firmly into the floor and reach up through the arms, straightening the right knee. Turn the feet forward and release the arms with an exhalation. Take a few breaths, then turn the feet to the left and repeat for the same length.
Beginner's Tip
When your are bending the front knee As a beginner you have a tendency to tilt the pelvis forward.You must lift the pubis up toward the navel and lengthen the tail toward the floor.
5. Downward-Facing Dog (Adho Mukha Svanasana)
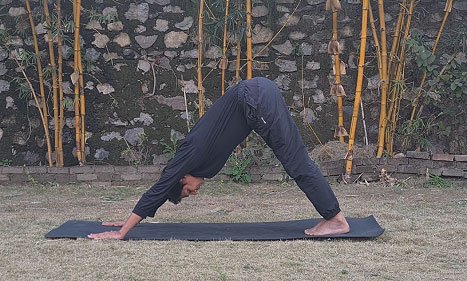
Downward Dog is used in most yoga practices and yoga classes and it stretches and strengthens the entire body. It may be the first pose you learn as you begin a yoga practice. It acts as a transitional pose and can be a resting position.
How to do it
- Come onto the floor on your hands and knees. With your hands slightly forward of your shoulders and knees below your hips.Spread your hands wide and press your index finger and thumb into your mat.
- Exhale and lift your knees away from the floor lift the butt toward the ceiling. Straighten your legs as much as you can and press your heels gently toward the floor.
- Your head should be between your arms, facing your knees, and your backs should be flat.
- Hold for 5-10 breaths.
Beginner's Tip
If you have difficulty releasing and opening your shoulders in this pose, raise your hands off the floor on a pair of blocks or the seat of a metal folding chair.
6. Upward-Facing Dog (Urdhva Mukha Svanasana)
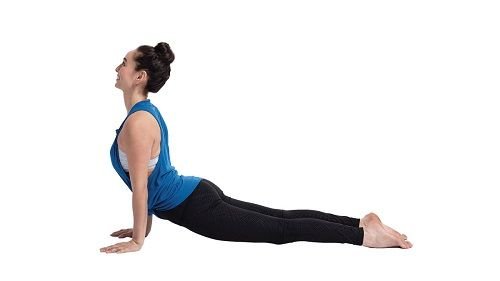
Urdhva mukha svanasana, or upward facing dog pose, is often practiced in sequence with adho mukha svanasana, downward facing dog pose. It is is a powerful pose that awakens upper-body strength and offers a wonderful stretch for the chest and abdomen.
How to do it
- Lie on your stomach on mat . Stretch your legs back, with the tops of your feet on the mat. Bend your elbows and spread your palms on the mat beside your waist.
- Inhale and press your inner hands firmly into the mat Then straighten your arms and simultaneously lift your cheat up and your legs a few inches off the mat.
- Pull your shoulders back, squeeze your shoulder blades, and tilt your head toward the ceiling, to open up your chest.
Beginner's Tip
There's a tendency in this pose to "hang" on the shoulders, which lifts them up toward the ears and create pressure at the neck. Actively draw the shoulders away from the ears by lengthening down along the back armpits, pulling the shoulder blades toward the butt,You can also use block undenath each hand.
Feel free to drop your knees down to reduce tension in your low back
7. Seated Forward Fold ( Paschimottanasana )

It's important to incorporate a forward bend in yoga practice to stretch the hamstrings, lower and upper back and sides. Seated forward bend is the perfect yoga pose for beginners to start to open the body and learn to breathe through challenging positions.
How to do it
- Sit on the floor with ith your buttocks supported on a folded blanket your legs extended in front of you. Breathe in and raise your hands over your head and stretch. Extend the arms forward, reaching for your feet.
- Lift your chest engage your lower abdominals and imagine your belly button moving towards the top of your thighs.
- Hold the pose for up to 10 breath before slowly releasing with an inhalation.
Beginner's Tip
If you feel any sharp pain, you need to back off; but if you feel the tension when you fold forward and you can continue to breathe, you will slowly start to loosen up and let go. You can also keep your knees bent in the pose as long as the feet stay flexed and together.
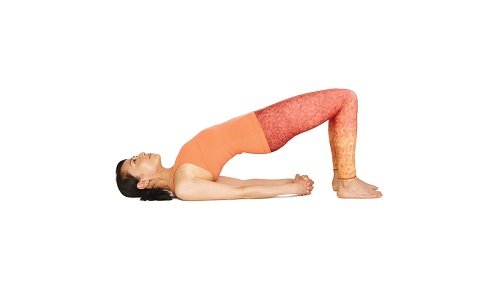
8. Bridge Pose (Setubandhasana)
Downward Dog is used in most yoga practices and yoga classes and it stretches and strengthens the entire body. It may be the first pose you learn as you begin a yoga practice. It acts as a transitional pose and can be a resting position.
Bridge pose (Setu Bandhasana) as a way to bridge the gap between body and mind. A counter pose to a forward bend is a back bend. Bridge is a good beginner's back bend that stretches the front body and strengthens the back body.
How to do it
- Begin lying comfortably on your back in a supine position and place your feet hip width apart.
- Press firmly on to your feet and lift your butt up off the mat. Interlock your palm and press the shoulder toword the floor.
- Imagine dragging your heels on the mat towards your shoulders to engage your hamstrings. Hold for 8-10 breaths then lower your hips down and repeat two more times.
Beginner's Tip
Commentaires
Enregistrer un commentaire